Friday, April 29, 2011

Diaper Cake

Step 1. Ingredients for a diaper cake:
You can get all of these at a local baby supplies store. (You may need to go to a craft store for the ribbon)
• 60 diapers (depends on how big you make it) You can use either disposable or cloth - better find out what the expectant mother would like. You can use either white or patterned diapers.• Ribbon, 1/2 or 1 inch wide, patterned to fit the baby shower theme. Pink, blue, or yellow are good choices.• Ribbon, 1/4 inch to tie rolled diapers with• 36-60 small rubber bands (depending on how you want to "build" the cake• 6 large rubber bands• One 8-oz baby bottle or one large bottle of baby lotion• One 4-oz baby bottle• A cardboard or plastic cake platter• Cake decorations - for example, baby confetti, baby sock roses, artificial roses, etc.• Baby items - Pacifiers, bottles, lotion, bibs, receiving blankets, miniature stuffed animals, baby towel, onesie, wash cloths, baby hygiene products, toys, etc.

Step 2. Here we go: Let's build this cake one tier at a time.
For the first tier, you will need about 35 newborn or stage 1 diapers. Unfold 17 of them and, one at a time, roll them up tight, starting from the front of the diaper and rolling it to the back. The tighter the better. Place a rubber band around the center after you roll each diaper up to hold it tight. These are the inner diapers for the cake.Take the cake platter and place the 8-oz baby bottle or large bottle of baby lotion in the center. Then place about 5-6 diapers around the bottle and put a large rubberband around the entire ring of diapers.
The picture below is what your cake will look like at this point:


Next, form a 2nd ring with the remaining 11-12 diapers by placing them around the 1st ring of diapers. Complete it by placing a large rubberband around the 2nd ring.
Now for the final ring of diapers for the 1st tier: Take 18-20 diapers, unfold each one, roll them up tight like before, but instead of a rubber band around each one, tie a thin, 1/4 inch piece of ribbon around the middle around each one. Then place them around the second ring to form a 3rd ring. Now take a large, 1/2 to 1 inch wide ribbon and tie it around the entire tier to hold them all together in a circle shape.
(Note, you could use just rubberbands around each diaper for the 3rd ring if you have opaque ribbon to hold the 3rd ring together. The important part is that no rubberbands are showing when you are done.)
All right! you have made the 1st tier. Here is what it should look like:


Step 3. The second tier is made much the same way, only instead of 3 rings, you will only make 2 rings of diapers. Just like the 1st tier, the inside ring will need about 5-6 diapers. Part of the 8-oz bottle will be sticking out of the 1st tier, so place your 5-6 diapers around it to form the 1st ring of the 2nd tier. The 2nd ring will need 11-12 diapers. Place a ribbon around each one of those 2nd ring diapers and hold them all together in a circle with the 1/2 to 1 inch wide ribbon, just like before.
Here is what the finished 2nd tier will look like:


Step 4. Third tier is easy!It is probably easiest to assemble this tier on a table and then place it on the rest of the cake after it is assembled. So, take a 4-oz bottle and place it on the table.Then take 5-6 diapers and roll them up like before and tie them with the thin ribbon.Then place them around the 4 -oz baby bottle and tie your wide ribbon around it to hold it together tightly in it's shape. Take the top tier and place it on the top.
Drum roll, please! And now for the finished product...

Toy Blocks

Materials needed to make baby toys baby blocks:
fabric (about 1/4 yard each)
matching threadsewing needles
pillow fill
(optional) bells, rattles, or crinkle plastic

Start by making yourself a pattern template to cut your fabric with, or print the one I provided for you. To make your own pattern all you need is a to cut a piece of paper or card board into a 5" by 5" square.

Cut around this square or trace the square onto your fabric using a sewing pencil and then cut the fabric from there. You will need to cut out six 5" squares to form one baby block. You can use the same fabric for all sides of the block, but I recommend cutting three sets of two from different fabrics. If you choose to make baby blocks that are all different colors and patterns a good plan is to buy 3 different matching fabrics, but buy enough to make three to six blocks or the project will not come out right.

If you look to the diagram to the below, you will see how I placed the different patterns away from each other. When the baby blocks are sewn together each square of identical fabric will be directly opposite from each other.
The easiest way to sew them together is to start by sewing pieces B and D to fabric square A. Then sew on C, E, and F. Once you have this part down on comes the trickier part, but don't worry it is still easy.

Move on to sew together squares B and C. Place the seams together so that they are facing in towards each other and sew away. Keep going by sewing together C and D. Next is B and E, D and E, and so on... You get the picture.

Thursday, April 28, 2011

Tutu for Girls

This is the one I made~ Make sure you scrunch your tulle together really well to have a really full tutu! I use about 20 yards of tulle in each of mine.

To measure your waist, make sure you measure your model and then take off about 2-3 inches of elastic. I know that sounds drastic, but as you put on the tulle and tighten it, it stretches the elastic out and makes it bigger..so if you don’t take down the waist size before, your waist will end up really big and you will be taking it half apart. Trust me, I did it twice.

On elastic size, that’s preference. I find with older girls, the 1 inch is a good size, but for the babies, you may want something less wide like a 3/4th inch elastic. They cost about $1.20 at Walmart.

To add to these instructions since it isn’t listed in a lot of places, 6 inch tulle works really well, not the big tulle you find on the bolts. I use the big tulle on the bolts, so I end up having to cut in a lot of ways to get it to be not to thick. If you go that route, you generally have to cut the length and width.

Premeasure your tulle out and have it all ready so you can basically go from start to finish. A general rule is that it should be about 22-24 inches in length so when you fold it in half, it hangs long enough. If you measure out 24 inches, it will be 12 inches in length. So basically half your length to determine how long the skirt is. I do all the trimming at the end so I dont worry so much.

Where you did the sewing will be a little hard to close the last few pieces of tulle over the top. I always put an embellishment in that area to cover up any discrepancy.


TIP: Instead of Elastic, you can use big satin ribbon and the just tie in a bow. Its easy removal…but that’s half the problem…your child, especially if you have a young one, can remove it. Elastic is a lot more snug.

Some Halloween Ideas for Tutus:

  • Red Tulle with Black Puff Balls glued on Make a LadyBug
  • Orange, Purple, and Black tulle for a witch
  • Yellow, Orange, White for Candy Corn
  • Hot Pink and Lime Green for Strawberry Shortcake
  • White and Light Pink for a “50′s” Look
  • Purple and Light green for a Fairy
  • Yellow and Black for a Bumble Bee

Make sure you add some embellishments like sparkles or pom poms when your done! I added flowers to mine!

Website Reference

Monday, April 25, 2011

Silk Tie Easter Eggs

1. Take raw eggs and wrap them in 100% silk.
2. Using an old pillow case or sheet wrap the eggs one more time.

We used twist ties but elastics or string would work too.

3. Boil eggs in any type of no-alluminum pot along with 1/4 cup vinegar. Once the water comes to a boil, reduce heat and let them do there thing for 20-25 minutes.

* We hollowed out some eggs by poking a small hole in each end and blowing out the insides before we dyed them and it worked well. The only problem is that the hollow eggs don’t sink in the water so we had to put a heavy lid to hold them under.

4. Unwrap! This is the best part. I was so thrilled at how they turned out.

Website Reference

Sunday, April 10, 2011

Easter Story With Eggs

1. Each egg will have objects that represent an event that happened during the last few days of Jesus Christ's life inside along with a scripture to read. You can either have the entire scripture on a slip of paper or just the scripture reference. There are several ways that you can tell the Easter story with Easter eggs. You can open one egg a days and talk about it, like an advent calendar. You can hide the eggs along with your other Easter eggs and then use them to tell the story before the kids dig into their candy. You can also just have them in a basket and pull them out one by one to tell the Easter story. Use a permanent marker or stickers to number the eggs.

2. Put the cracker into the first egg along with the scripture Mark 14:22-24. The bread represents the Last Supper.

3.Put the small cup into the second egg along with the scripture Luke 22:42-44. The cup represents the time Jesus spent in the Garden of Gethsemane.

4. Put the 3 dimes into the third egg along with the scriptures Matthew 26:14-15 and Matthew 26:47-49. The dimes represent Judas betraying Jesus Christ for 30 pieces of silver.

5. Put the small piece of knotted twine into the 4th egg with the scripture Matthew 27:28-30. This represents Jesus being bound and taken before Pilate.

6. Put the small piece of soap into the 5th egg with the scripture Matthew 27:24-26. Pilate washed his hands of the affair and allowed Jesus to be crucified.

7. Put the piece of red cloth and the thorn into the 6th egg with the scripture Matthew 27:28-30. This represents the scarlet robe and crown of thorns that were placed on Jesus.

8. Glue the toothpicks together in the shape of a cross and put them in the 7th egg with the nail. Include the scripture John 19:16-19. This represents the Crucifixion of Jesus Christ.

9. Put a nail in the 8th egg with the scripture Matthew 27:28-31. This represents the nails in his hands and his feet.

10. Put the white cloth in the 9th egg with the scripture Matthew 27:57-60. This represents Joseph wrapping Jesus' body in white cloth.

11. Place the small rocks and the single larger round stone into the 10th egg. Include the scripture Matthew 27:62-66. This represents the tomb Jesus was laid in and the rock used to seal the entrance.

12. Place the spices onto the small piece of cloth and tie it closed with the string. Place this bag of spices into the 11th egg with the scripture Mark 16:1-3. This represents Mary coming to anoint the body with spices.

13. Leave the 12th egg empty except for a piece a paper with the scripture Mark 16:4-6. This represents the empty tomb because Jesus Christ was resurrected.

Saturday, April 2, 2011

Child Hooded Towel

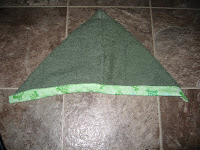
1. Each hoodie towel requires 1 big towel and 2 washcloths (washcloths do make it really big. Use hand towel and cut it in half. Much better). You could buy new or use old ones if you have lots of extra towels and washcloths (hand towels).

2. Pin the two washcloths together on 2 adjoining sides (like an “L”).

3. Use your sewing machine to sew the washcloths
together. I did this twice to have extra strength. I used a plain old zig-zag stitch.

4. Take the big towel and determine which side you want as the inside of the towel and lay that face down of the floor.

5. Measure and find the center of the big towel. Mark this with a pin.

6. Take the sewn together washcloths and fold it into a triangle so the 2 sewn sides are in the middle, touching, like below.

7. Use the pin in the middle of your big towel to determine placement and pin the closest side of the washcloths onto the big towel.

8. Carefully sew the washcloth piece onto the big towel, making sure that the outer parts of the hood do not get attached by accident. I also did this twice over for extra strength.

9. Try on your toddler or give as a gift!

Website Reference

Changing Pad and Wipes Holder


Materials

1/2 yard of chenille
1 yard coordinating cotton fabric
1 yard ribbon
Fray Check


Cut chenille to 22"x18".


Cut coordinating top fabric to the same size.


To make the pocket: cut out a 9" x 17" piece of the coordinating fabric.

You will be placing the pocket on the lower left hand side, so hem the top and right sides of the pocket.


Attach to the top and secure with pins.


Stitch along the right hand edge, right over the exposed hem.

Now here is the tricky part. Make a light mark with a fabric pencil 4 1/2 inches from the right side in. You need to do this at the top and bottom of the pocket. This is going to be a smaller pocket for a sippy cup or bottle. Sew a straight line, using your marks as a guide. Backstitch at the top for extra strength.


Place ribbon on the left hand side, half way down the pocket. This is about 4 1/2 " up from the left bottom corner. Stitch in place. Seal the ends with a little Fray Check. This makes it so the ribbon won't unravel in the wash.

Pin right sides together, making sure that the loose ends of the ribbon are not going to be attached where they shouldn't.


Carefully sew around the edges. This can be a little tricky because the chenille tends to stretch. I like to pick a spot in the middle of a side, and sew one direction. Go back to the center and sew the opposite direction on the same side. This seems to create and even amount of tension.

Leave a three inch gap somewhere to turn it inside out.


Turn right side out. You will still have a little gap. I will show you what to do with this next.

Make sure to use a small blunt object to poke the corners out flat. Iron out.
Link
Pin the gap closed, matching edges. Sew a 1/4 " top stitch around the entire edge of the changing pad. Easy as pie!